
Until recently our “chicken watering system” was just buckets of water in each chicken tractor. One bucket for every 3-4 chickens, and 3-4 buckets of fresh water to top them up each day. We don’t have any taps in the paddock with the chickens, so this meant carrying water from the house tap to the chickens, a few hundred metres of walking for each load of buckets (welcome to the green gym). And then the chickens would regularly tip over the buckets, and the water got dirty very quickly and had to be tipped out anyway. This often meant a trip back to the garden with a bucket of dirty water (water is very precious here!). So there was a lot of water carting and water wastage. The other annoying part is that we have to pull out all the buckets when we move the chicken tractor along every few days, and Bella the cow had a habit of trying to get to the buckets (she loves water from buckets) and tipping them over as well.
There had to be a better way! The crazy thing is that we had been given some chicken water nipples a couple of years ago and they had been rattling around in the glove box of the ute ever since and we had thought about using them, but never done anything about it. Then Pete had a flash of inspiration and motivation and collected all the bits he needed to whip up a manifold (from steel of course, but plastic is also commonly used), connected to a hose, connected to a 15 L plastic jerry can and suddenly we had a simple watering system that keeps the water clean and reduces the amount of time and water spent on the chickens.
Once you set your mind to it, this is actually quite a quick and simple project that will save you time and water. Don’t delay it like we did, just gather your materials and get building!
 |
| a hen using the new system |
Once you set your mind to it, this is actually quite a quick and simple project that will save you time and water. Don’t delay it like we did, just gather your materials and get building!
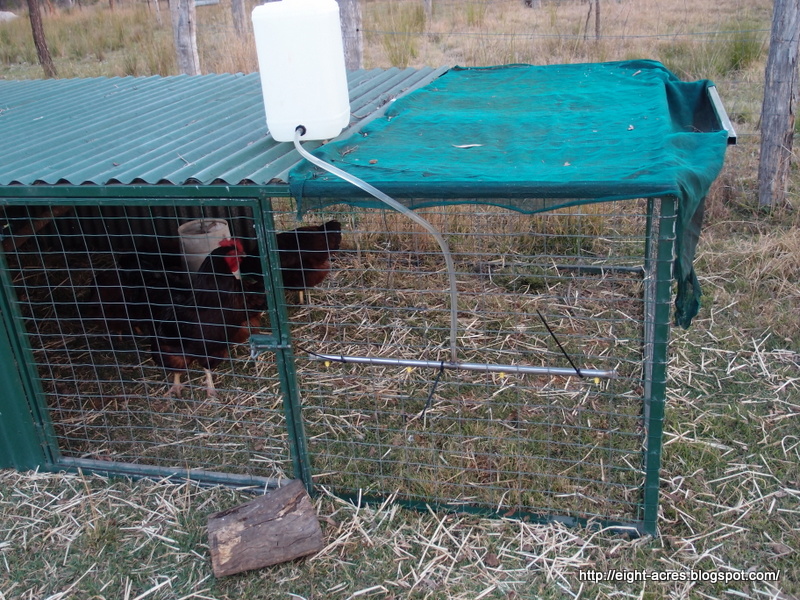 |
| our new chicken-nipple watering system (the log is there to put in the door when the chickens are free-ranging so that Bella doesn't shut them out) |
What you need to do
Chicken nipples – $2-3 each, plastic or stainless steel (we used the plastic ones for the first system and then bought some steel ones for the rest, because then Pete could weld them).
Manifold material – can be any pipe, or even box section (RHS), stainless or pvc or irrigation pipe are best for water quality. Ask your local plumber for offcuts of PVC pipe or try the dump-shop. Gavin has a good example of a plastic system over at the Greening of Gavin.
Hose and fittings – any suitably sized hose to connect the manifold to the reservoir, and all the fittings you need to make this happen.
Water reservoir – a closed container is better, but not completely sealed or the water won’t flow, we used a 15 L plastic jerry can with a tap fitting at the bottom and the lid cracked open. We paid $5 for our jerry cans from the local market, they were used previously for cordial, so ask around in places that might buy bulk cordial, you should be able to find something secondhand. Ideally you don't want light to get to the water, or you will get algal growth, but a clear container makes it easier to see the water level. We used a clear container and I made a cover from an old t-shirt.
The nipples can be simply pushed into a suitable sized hole drilled into the manifold, but Peter was keen and tapped the hole so that they screw in and seal well. Then set up your connection to the reservoir. Peter welded on another piece of pipe to connect the manifold to a hose, but if you’re using plastic you will have to buy the appropriate fittings to build the shape you need. Then just use the hose to connect the reservoir to the manifold. Its surprisingly easy to set up really.
 |
| Here's Roosty using the nipple, he got really excited and pecked it over and over |
But will the chickens know how to use it?
I was worried that our chickens would not know how to use the new system. I thought they might all die of thirst, but I was wrong. Even the rooster figured it out within a few minutes and was excitedly tapping away at one of the nipples. When we installed the manifold, we had already filled it with water to test it, so water got spilt all down the side of the cage, and the chickens pecked all the drops of water off the mesh and then the drops off the manifold, and somehow found that pecking the nipples made more water come out. Pretty smart for bird-brains!
We haven’t tried it on the guinea fowl yet, that will be the real test!
Isn’t it expensive?
If you look around for some reclaimed items, the only things that you HAVE to buy new is the nipples and maybe some fittings and hose (so that it doesn’t leak). The total cost of our first system was $5 for the jerry can and $1 for the tap, because we had all the other bits lying around. If we’d had to buy everything I think it would still have been around $20, which is pretty cheap for the convenience of not topping up those water buckets every day!
Have you tried chicken nipples? Any tips? Any other suggestions for chicken water?

By the way, my chicken eBook is now available if you want to know more about backyard chickens and using chicken tractors. More information over at the chicken tractor ebook blog. Or you can get it directly from my shop on Etsy (.pdf format), or Amazon Kindle or just send me an email eight.acres.liz {at} gmail.com.

What's the eBook about?
Chickens in a confined coop can end up living in an unpleasant dust-bowl, but allowing chickens to free-range can result in chickens getting into gardens and expose them to predators.
A movable cage or “chicken tractor” is the best of both options – the chickens are safe, have access to clean grass, fresh air and bugs. Feed costs are reduced, chickens are happier, and egg production increases.
But how do you build a chicken tractor? What aspects should be considered in designing and using a chicken tractor effectively? In this eBook I aim to explain how to make a chicken tractor work for you in your environment to meet your goals for keeping chickens.
I also list what I have learnt over 10 years of keeping chickens in tractors of various designs and sizes, from hatching chicks, through to butchering roosters.
Reviews of the Design and Use a Chicken Tractor
Just be careful to watch that they *are* getting enough water. My friend tried this system and thought it was great until the middle of summer, when all her hens mysteriously stopped laying. They had been laying like mad before. She couldn't figure it out until one day she left a bucket of water in the coop and noticed the hens just swooped down on it and started drinking. She left the bucket there, and within a few days the girls were all back to laying! Chickens dehydrate very easily, and if they only drink enough from the nipples to live, they may not get enough water to lay eggs. Nipple systems seem to work well for some people, but obviously there are contrary chickens.
ReplyDeleteMaybe some breeds need more water than others?
ReplyDeleteI love the idea, I think I will incorporate this into my rooster (waiting-for-a-home-or-dinner-pot) pen.
Yes,chooks use up a heap of water, and I use the washings from the buckets on the garden too; the silverbeet prefers this water anyway.
I use galvanised water drinkers. They're cleaner than a bucket and can't get knocked over but they need carrying so your system looks more efficient.
ReplyDeletefantastic! i always wondered how/if this would work! great job!
ReplyDeleteWith reference to liselfwench's comment above about adequate water and Summer. The problem was most likely warm water, Chickens will avoid drinking warm water and consequently dehydrate. In Summer on particularly hot days even though we have fairly large containers of water in shade we will still go out and refresh the containers with cold water several times during the day.
ReplyDeleteTimely post! I was just looking at this as an option for my mini chicken tractor.... thanks!
ReplyDeleteThanks Liz, you've just solved my chooker mole watering problem
ReplyDelete